Friday, September 30, 2011

Christmas Card created with Cricut

Two Saturdays ago, I held our annual Christmas Card Making Day in Lancaster County!  This was our 4th time hosting this Christmas Card Making Day event and it was our LARGEST group ever!  I started this day (4 years ago) as a FUN, enjoyable day for our customers.  I ask my downline to join me and we usually have 10-13 consultants that help out with this day!

We had a group of 43 ladies join us as we created and taught them how to create 12 different Christmas Cards using NEW stamp sets and as many new embellishments as possible! :) The ladies are grouped at the beginning of the day and then stay with that group, rotating every 25 minutes to a new table, to create a NEW Christmas card!  Of course goodie bags, door prizes and a home cooked lunch is all included! :)  A FUN day to create together!!!

Well, I ended up creating 3 cards this day and wanted to share ONE of the cards with you today! :)

In yesterday's post I mentioned the Cricut Art Philosophy Cartridge, and how I used this cartridge to completely create a Christmas Card...

Well, my brainstorm started when I saw the card shown on page 13 in the 2011 Fall/Winter Idea Book.  I thought "I will create that card and make it a "regular" size card! :)  So - that's what I did. 

So what do you think? :)   It is quite simple...and NO sponging of ink on the edges!!!  Amazing I didn't ink them! ;)


I love the red & green that the Christmas Holiday brings.  So festive and cheerful - and I wanted to bring that to this card as well. 

The green that I used is my FAVORITE color - Sweet Leaf.  I felt the strip of paper needed some more detail to it- and I found my Universal Backgrounds stamp set to be the PERFECT match! :)  Love how those music notes added the "extra touch".

Everything else on this card was CUT using the WONDERFUL Cricut Art Philosophy Cricut Cartridge!!! :)

I used the bracket on page 62 (oval 5) and then I used the creative feature key LAYER and cut the grey flannel bracket overlay. 

Check out the ENTIRE page of page 62 in the Art Philosophy handbook and notice ALL of the items you can create with just ONE BUTTON using this CTMH Cricut Art Philosophy Cartridge!!!!!

I cut the <Tree 1> on page 31 from White Cardstock and the <star 5> on page 40 from Creme Brulee cardstock.  I used the 3D flower on page 69 and cut these flowers from the Believe Designer paper! 

Stamp the "Happy Holidays" in Holiday Red ink , decorate the roses with the Stardust Glitz Glitter gel and this card is complete! :) 

If you would like to receive your OWN Cricut cartridge...AND get another THREE stamp sets for only $5.00 more - order TODAY!!!! 

TODAY is the LAST day to get these THREE stamp sets for $5.00 when you place a $75 order!! 

 Click here to see the details for this WONDERFUL deal!!! :)


Thursday, September 29, 2011

TWO more days to get AMAZING savings!

September 30th is arriving fast and you will want to make SURE you don't miss out on Close To My Heart's FABULOUS deal!

During the month of September, in honor of National Stamping Month...
           when you purchase $75 in CTMH items - you will receive the
Pair-A-Phrase stamp set for FREE!!!!!

This set has a retail value of $35.90 and has a VARIETY of different images included! 
Take a look :) (click on any of the pictures to see a larger image of it!)


Here are some amazing works of art that the CTMH design team has created using this stamp set...


Use your "center point" button on the cricut to cut out a shape in the middle of your card!


LOVE those cricut cut flowers!!!


Did you notice the scalloped edge? 
This is one of our zip strips...the 1/2 inch piece at the top of all of our 12x12 patterned papers! :)


Scalloped borders are EASY to cut using CTMH's Art Philosophy Cricut Cartridge! :)


Simple, but beautiful!!!
 DOn't forget - there is ANOTHER special for the month of September!!!

When your sales reach the $50 mark -  you will have the option to purchase an EXCLUSIVE stamp set (that retails at $17.95) for just $5.00!!!

Limited Edition is this EXCLUSIVE stamp set...


So - let's put this together to see the

AMAZING DEAL

you can get for another 2 days...it ends on Sept 30th at midnight!!;) 

     You can purchase $70 in CTMH products...
                 and purchase the EXCLUSIVE Stamp of the Month set for $5.00 which makes your total $75.00!!!!

THEN, you will receive the Pair-A-Phrase stamp set (shown above) for FREE!!!

The Retail VALUE for the THREE stamp sets comes to $53.85....and you will be getting these 3 stamp sets for just $5.00!!!


YOu probably noticed that once again I talked and shared examples with you using the Cricut Art Philosophy set. :)  This is the PERFECT month to purchase that Cricut cartridge and get ALL of these EXTRA stamp sets for FREE!!! :) 
 
Stay tuned tomorrow as I share a Cricut Christmas Card that I have created!!!  I am AMAZED at how much I am using the Cricut cartridge and wondering HOW I didn't use this machine prior to CTMH's release! LOL!!!  With 700 different images (not SIZES) on the CTMH Cricut cartridge - the ideas are ENDLESS!!!


Blessings to each of you!!! :)
CHeck out my website here to see what is included in this amazing Cricut BUNDLE. 

Monday, September 26, 2011

Blog Award! :)

Wahoo!!! Imagine my surprise that I was awarded a BLOG AWARD!!! Thank you to Gina for passing on this special award! 

Gina has a GREAT blog that you will want to make sure to check out!!!  Just CLICK HERE to check out her newest creations!  When  you see all the BEAUTIFUL artwork that Gina creates, you'll want to make sure to "Follow" her blog!!  Make sure you click on the "Follow Me" button!


Now it is my turn to pass this award on to five of my favorite blogs with less than 200 followers.  If you like their blogs, remember to "Follow" them.  The hope is to help out some of my fellow bloggers, and get a few more followers of my own. 

If you see your name/blog listed here, please pass the award on to 5 more blogs that have less than 200 followers.  Here are 5 of my favorite blogs.

Broken Treasures

Live Scrap Love

Lavender Sage Designs

Booth 32

Carla Creates

Thanks so much and have a HAPPY Monday! :) 

Blessings!

Thursday, September 22, 2011

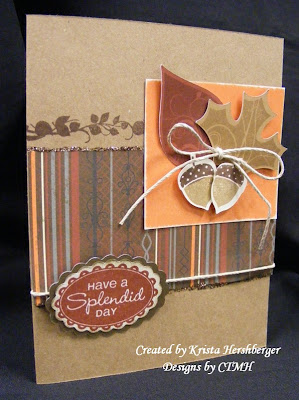
Fall card using Cricut!

The Cricut AP cartridge has made things soooo much easier!  Beautiful cut images, and stamps that match them perfectly - a PERFECT combo!

We have been creating this card at my home gatherings during the month of September.  This is the card we create at the end of the evening after I've finished sharing the Idea Book tour.  I LOVE having this opportunity to let my guests work "hands-on" with our FABULOUS CTMH products - especially if this is something new to them! 

I used Close To My Heart's Cricut Cartridge - Art Philosophy - to cut out FIVE of the images on this card!! 

The paper pack that I chose to use is the Mischief paper, and I pulled in some of our Kraft Cardstock as my card base. 

On a side note, did you KNOW that you can receive 24 sheets of cardstock in our White Daisy, Colonial White or Kraft colored Cardstock for ONLY $9.50!!!  I LOVE this option, because I use these three colors the most for my base pages/cards!

The new stamp set "Harvest Happiness" is the PERFECT set for this card!  Add a bit of hemp, some 3D foam and Bronze Glitz Glitter gel - and this card is complete!

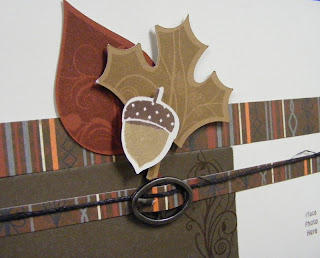
I also redesigned a layout that corporate had shown us while at Convention this past summer.

Here it is...

I used most of the same items on this layout as I did on my Fall card.  I LOVE the fact that you can take any card design and make it on a larger scale by turning it into a 2 page layout!!! 


Have you ever tried this?  If not - I challenge you to try it today! :)

Don't forget you have a week and a FEW DAYS to take advantage of the WONDERFUL special CTMH is holding during the month of September!

Purchase $75 in products and get the Pair-A-Phrase stamp set (retail value $35.90) for FREE!!! 

PLUS you want to make sure you get YOUR "Limited Edition stamp set - the September SOTM (ONLY available in Sept) for $5.00 when you place a $50 order!!!

Head on over to my website where you can get these FABULOUS items today! :)

Blessings to each of you!!!

Thursday, September 15, 2011


OH my, oh MY!!! J

Check out a few of the items listed below. (There is a LOT more items shown on my site!!) 

There have been NEW items ADDED to the While Supplies Last section of my Close To My Heart WEBSITE!!! 
You will want to act FAST – as these GREAT DEALS will go quickly!!! 


Click here to start your BARGAIN SHOPPING today! J


TWINKLE BRADS – 75% off                      $1.00

MIRACLE IRRESISTIBLES – 75% off          $1.00

3-RING BINDER – 66% off                       $2.00

PIVOT POINT STAPLER – 61% off              $5.00

FANFARE LEVEL 1 paper pack – 30% off   $7.00

SOPHIA LEVEL 1 paper pack – 30% off     $7.00

SOPHIA JOURNALING SPOTs- 11% off      $3.50

EDGE ANCHORS – 67% off                       $1.50


If you would like to save on shipping AND are willing to wait a couple of days, you may contact me to place your order J  HOWEVER – some of these items may already be gone (I have NO way of knowing when things will be sold out – sorry!) and unavailable if we wait a couple days to order. 

Please feel free to contact me with any other questions!

Blessings to you! J

Tuesday, September 13, 2011

Walking in a Winter WONDERLAND!

My last two items I created for the swap with the WONDERLAND paper pack were two cards…one clear card and one card using our NEW White Daisy Die-Cut card J

Here is the clear card I chose to create…using Clear Cards are SO much FUN!!  (Please don’t mind the picture taking quality…one thing that is difficult with clear cards is to NOT get your reflection in the card while you are trying to capture an image of it! J )
You have to think in a different way when creating with clear cards and it makes it so interesting! J  Why do you have to think differently?  If you haven’t created with the clear card, this may not make sense to you J. 

Let me explain…you get to choose what section of your card to adhere your layers of paper to.  You don’t have to tape every piece of paper to the front or top of your card! With the card being CLEAR, you can see through the entire card! 


For instance, the grey flannel square, 2 snowflakes that I cut out (prior to knowing we had a FABULOUS Cricut cartridge! LOL!!!)  and the 2 sparkle buttons from our Bling Assortment, are glued to the FRONT of this card. 

I used CTMH’s Cocoa Embossing powder on the large snowflake and then cut that out.  I used Crystal Blue ink to stamp the smaller snowflake.  The silver glitz gel just adds an extra sparkle! J

The dotted paper from the Wonderland paper pack is glued to the inside, front of the card.  The scalloped crystal blue cardstock is glued to the inside back of the card?  Make sense? J  So, once your card is put together…the layers all match up, but have more of a 3D look!  FABULOUS! J

I did try and take a picture of this…it’s a boring picture (LOL!) but hopefully this will help you “make sense” of how you can layer your paper on a clear card! J


Close To My Heart carries 2 different types of card packs of Clear Cards.  Click here to see the 4 designs of clear cards that we carry – die cut card & rectangle in one pack, and circle cards and square cards in the 2nd pack.

My 2nd card is a card using a GREAT NEW stamp set called Bundled Buddies. J Isn’t this beaver Adorable???  You can check out the rest of his friends that come with this stamp set by clicking here! J  I can’t WAIT to use these critters for friends & family that have winter birthdays! J 

I LOVE that CTMH is now selling two different designs of die-cut cards!!  If you have been with CTMH for a bit, you will remember when the white daisy die cut cards were first introduced in a promotion special J  Since that day, so many of us consultants have been using that card shape as a pattern and have been tracing the edge of the card onto our own cardstock and cutting it to create this design…LOL – I know we are diehards, aren’t we? J

The die-cut design cards have a unique and different appeal – I love it! J I thought this design would add FUN to a card stamped with the Bundled Buddies Beaver. 

I used the Cricut AP cartridge for the bracket shape that he is stamped in.  I also created the small scalloped oval with the AP.  Now, please don’t look at my coloring…I know I NEED LESSONS! J LOL!!  I used our waterbrush along with our ink pads to attempt my coloring.  The colors used were grey flannel, crystal blue and chocolate. 


Take a look at the sign holder stuck in the snow J.  Can you tell where I got my “ribbon” from?  You probably noticed that it’s not “ribbon like” but rather looks like paper, and it is!  I cut one of the zip-strips (the ½ inch designer strip that comes on EACH of our NEW 12x12 designer papers!) in half and “tied” my ribbon! J

I LOVE these new stick pins…so many options to use them.  Also, I used Liquid Appliqué to add some snow to the card.  Adding the stardust glitz glitter gel to the “snow” made it look more real – or so my husband thought ;). 

I will include my recipes for these 2 cards below, in case you would like to create similar cards like these. 

Have fun as YOU create your cards, layouts, etc!  For me…creating is my “out”, my time to relax and enjoy the gift God has blessed me with in creating!  I hope you are able to enjoy a “creating” time today no matter what hobby you enjoy! J 

Blessings to you!!!

4 ¼ x 5 ½ White Die-Cut card –“Friends…”
Wishes ~ “Lucky Layers” pg 27

C1472               Bundled Buddies
X7146B             Wonderland level 2
X5919               Autumn Combo Cardstock (spring iris)
Z1473                White Daisy die-cut Cards
Z1686                Cricut AP Collection
Z2111                 Chocolate Ink
Z2124                Grey Flannel ink
Z2117                Crystal Blue ink
Z2217                Crystal Blue re-inker
Z679                 Liquid Glass
Z188                 Craft Jars
Z1612                Pin Clips
Z308                 Liquid Appliqué
Z1313                Stardust Glitz Glitter gel
Z1151                 3D Foam Tape
Z697                 Sponge
Z555                 Heat Tool
3174                  Blending pen

Snowflake Clear Card

D1480               Snowflakes
X7146B             Wonderland level 2
1385                  White Daisy Cardstock
Z2117                Crystal Blue ink
Z891                 Versa Mark ink pad
Z1482                Silver Glitz Glitter gel
Z1466                Bling Assortment
Z1247                Crystal Blue Waxy Flax
Z1246                Cocoa Embossing Powder
Z534                 Micro-Tip Scissors
Z1151                 3-D Foam Tape
Z341                 Mini Glue dots
Z1323                Clear Cards

Thursday, September 8, 2011

Christmas Cards using Wonderland paper pack :)


Are you excited to see some MORE Wonderland artwork? J  I have two more cards from the swap to share with you today…
     a 6x6 card and a 5 ¼ x 4 ½ holly card! J

When I first looked through the new Fall/Winter Idea Book – I quickly noticed on page 83 the new stamp set called “Glory to God”.  I LOVE this stamp set and was excited to be able to use this beautiful set to remember Jesus’ birth! So, this was a set I was planning to use for my Wonderland swap!

The 6x6 card design for this card was found in our Wishes how to book and it’s called “Open Outline”

To start, I needed to cut the circle out of the center of my card…so I dusted off my Coluzzle circle shape swivel blade & mat! J I do pull this out occasionally because I love how this little system works.  However…in this day and age, someone could probably give me a tip on how I could have cut out that circle shape by using my Cricut machine? J  I believe I might have been able to use the “Center Point” button on my Expression?  Anyone have any tips on that? J

I used our Cocoa Embossing powder to stamp the silhouette of Joseph, Mary, Baby Jesus and the star.   I had to jog my memory for some tips as I was embossing…don’t forget to have a used fabric softener sheet to wipe across your base paper prior to embossing! J This helps to take away static that loose embossing powder likes to cling to.
I loved the Scripture verse that comes along with this stamp set…but it was too big to stamp on the front of the card – sooo, I used the verse as a background stamp and stamped the verse in Cocoa ink onto the Twilight cardstock to give it some texture.  The “Merry Christmas” stamp is from the new stamp set called, “Holiday Cheer”. (can’t wait to create with this set too! LOL!)
In completing the card, I used our NEW Choc. Striped 1 ½” ribbon and our Antique Copper Designer Brads.  Of course, using the Bronze Glitz Glitter Gel finished off the card! J 

The 2nd card I used one of new A-size Stamp sets called “A Holiday”. 


The first thing I LOVE about this set…it coordinates with the Cricut!!!  Yay!!!  So, I got my Cricut buzzing and cut out a bunch of the holly shaped leaves.  Next, it was easy – I did some stamp rolling of my holly leaves on my PRE-CUT Cricut images J…I inked my holly stamp in Crystal Blue ink and then rolled the outer edges of the holly stamp in Twilight ink. I love the look that stamp rolling gives! 

Can you see where ELSE I used a pre-cut Cricut image on this card? J…Look closely…The grey flannel scallop border is a Cricut image!  This image was actually a double sided scalloped border that I cut in half and used the other half on my next card!

Take a look and you’ll see that I sponged Grey Flannel ink quite a lot too!  I inked the edges of the card in grey flannel as well as the edges of all the cardstock pieces. It is hard to see in this  picture, but the lightly sponged edges really added a nice extra touch to the completed card. 

Did you notice the background in the top of the card?  Yes – that’s right…it’s the holly border stamp that comes in this A Holiday stamp set!! J It was fun to be able to use almost ALL the stamp images in this set on one card!

Instead of using the holly berries stamps on this card, I chose to use our pewter Bigger Brads for the berries.  You will find the bigger brads AND many more adorable pewter embellishments in our new pack of Pewter Mini-Medleys. I love the extra touch that Pewter brought to this card. J   I also used one of the ribbon slides that come in the mini-medley pack, and a piece of Twilight ribbon from the Blue Designer Ribbon pack – to add an extra touch at the bottom of the card. 

So – what ideas has this card brought to your mind?  I believe I might try adding a color into this card…hmmm, maybe as part of the border?  What color would you add to this combination? Cranberry?  Smokey Plum? J

If you are interested in creating these card designs on your own, please feel free to go to my website by clicking here J. 

Here is a COMPLETE list of ALL the items used on these two cards!! 

Have a great night!

Nativity 6x6 card
Wishes ~ “Open Outline” ~ pg. 98

D1483               Glory to God
B1381                Holiday Cheer
X7146B             Wonderland level 2
1385                  White Daisy Cardstock
Z2111                 Chocolate ink
Z891                 Versa Mark ink
Z1483                Bronze Glitz Glitter gel
Z1088               Chocolate Waxy Flax
Z1410                Antique Copper Designer Brads
Z1617                Dark Chocolate Striped Ribbon
Z1246                Cocoa Embossing Powder
Z1294                Sanding Kit (file)
Z1298                Foam Tool
                        Coluzzle

“Merry Christmas” holly card
Wishes ~ “Simple Expression” ~ pg. 40

A1115                A Holiday
X7146B             Wonderland level 2
1385                  White Daisy cardstock
Z1686                Cricut AP Collection (scallop border
Z2124                Grey Flannel ink      5.3 – “fit to length”)
Z2160               Twilight ink      
Z2126                Heavenly Blue ink
Z1487                Pewter Mini Medley
Z1385                Blue Designer Ribbon
Z697                 Sponge
Z1151                 3D Foam Tape