Showing posts with label 12x12 glitter paper. Show all posts

Friday, November 10, 2017

Christmas Card Blog Hop

Welcome to this 
Special Blog Hop!


Today, we will be featuring BEAUTIFUL Christmas Cards....all using the Gorgeous, Quality products that Close To My Heart carries.   


If you have come here from,  Michelle's  Blog, you are on the right path!   If you get lost along the way, you’ll find the complete list of participating consultants by clicking HERE

  
This month we have  20 Close To My Heart Consultants sharing items they created using these FABULOUS items.   This hop is simple to do - just click on the link at the end of the post on each blog to move to the next one! Wahoo!! 

Here we go!
~~~~~~~~~~~~~~~~~~~~~~~~~~~~~~~~~~~~~~~~~~~~~~~~~

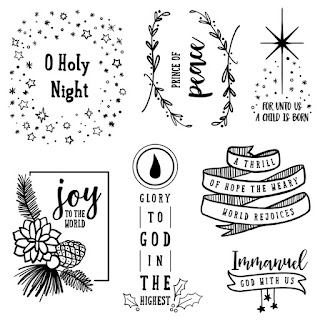
I adore the Christmas stamp set "Prince of Peace" as it reminds me about the REAL meaning of the Christmas season!  I also love to do "non-traditional" colors for Christmas cards :)....so out came my Sapphire & Eggplant shades of CS as I planned this card design. 

Here's my card for todays hop...  


I had fun creating this simple, re-creatable card.  (is that a word?? LOL!) 
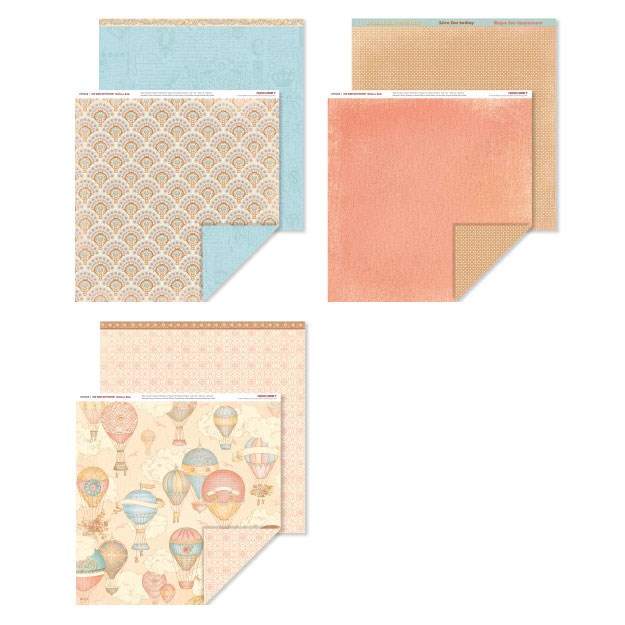
The gray designed paper on the front left of the card, came from our BEAUTIFUL Silver & Gold paper collection. 

Let's take a closer look...

Did you notice the Sapphire CS mat on the front, was embossed with one of our newest 5x7 Embossing Folders??  This embossed design is called Buffalo Plaid.

I wanted to include some "subtle" sparkle (if there is such a thing ;) ) ...and after cutting the Star from our beautiful White Glitter paper, using our Basic Stars thin Cut collection...I wanted just a "touch" more glitter.  


Can you see it??   I added clear glitter, with my Shimmer Brush, on the oval ring of stars!!  Yay!!! It worked! :) 

Next I wanted to create a simple inside...and I wanted this card to have a different fold than "normal"...yes, I know - craziness - but I must say it's quite FUN to change things up! :) This is what I came up with for the inside!!


I tied in the white glitter paper, but cutting our wonderful Tree Border from our Thin Cuts.  AND...then I looked at my stamp sets again, and realized how fitting it would be to use the "Hallelujah" stamp set for my inside sentiment. :)  

Also, I'm not sure how well you can see it in these photos, but I chose to use the lighter side of my Eggplant colored Cardstock to stamp my sentiment on.  I ADORE that our Cardstock at CTMH has TWO-COLORS...the regular color on 1st side & a lighter shade of that color on the backside!! Wahoo!!!

Here are the 2 stamp sets I used on this card.  If you are looking for a Christmas stamp set, these may just be what you are looking for!! 

 D1734 Prince of Peace stamp set

 B1567 Hallelujah stamp set


I hope you enjoyed this card, and were INSPIRED today!! :) 
Now it's time to "Hop" on over to Alyson's  Blog to see her beautiful creation!

---------------------------------------------------------------

Be sure to visit ALL the Consultants at their Blogs to get some great crafting ideas and other fun ideas!   We LOVE to hear any feedback you’d like to share as well, so feel free to take a moment & leave a comment. 


Feel free contact your CTMH Consultant (or click here if you need a consultant :)) 
so that you can see more of the BEAUTIFUL, Christmas products we carry here at Close To My Heart! :) 


Blessings to you for a WONDERFUL day!!!

Krista 

Friday, September 9, 2016

Joyful Stars Blog Hop- Baby Boy card

Welcome to our monthly  
 Joyful Stars Blog Hop!!!!
We're excited to share our creativity with you using PRODUCTS
from Close To My Heart!!

Come on in and see what BEAUTIFUL projects my fellow consultants have creating using the AMAZING products from Close To My Heart!!

 This blog hop is easy to do…just click on the link at the end of the post to go to the next creation!!  If you get lost along the way, CLICK HERE to see the list of this month’s hoppers! 
~~~~~~~~~~~~~~~~~~~~~~~~~~~~~
If you have arrived from Betty's blog you are right on track.


Here is the card I created for today…


The NEW Fundamentals papers are beautiful & can be used for so many things!  The Fundamentals come in our Enchantment, Adventure, Whimsy & Basic color palette!!   

Here’s a close up look at the WHIMSY collection that I used on this card. I also used Slate & Canary cardstock. 


Whimsy Fundamentals 2016 _DSC_2166
This card was basically a Cricut card...using the NEW Flower Market Cricut Cartridge!!  Have you checked out this NEW cartridge yet?  

I used the sailboat on page 8 of this booklet, and the star border is found on pg. 37.

Click on the Flower Market booklet below to go see all 700 images that are INCLUDED on this "tiny, bitty" AMAZING cartridge. 


Let’s take a closer look at the card…


Do you see the shimmer??  

I used the NEW SEA GLASS glitter paper!  I am so AMAZED at how well our 12x12 glitter paper cuts with the Cricut machine!  AND...the glitter paper barely "flakes" off glitter either!  I've been very impressed with this product!

The flag was cut with the glitter paper...and then can you see the star? 

Look closely to see that I added some extra "shine" to the star with our NEW "Shimmer Brush"....a GREAT way to add slight sparkle to any of your projects!  


Thanks for stopping by, and I hope you were inspired to ready to go CREATE something on your own! 

~~~~~~~~~~~~~~~~~~~~~~~~~~~
Now it’s time to Hop on over to Marie’s  blog and see what beautiful, crafty item she has to share with us!  

Happy Hopping and we’ll see you on the 9th next month, when the Joyful Stars team members will be sharing more artwork using Close To My Heart products!    


Blessings to you for BEAUTIFUL day!!!

Krista Hershberger 

Wednesday, December 9, 2015

Christmas Ornaments - Joyful Stars Blog Hop

Joyful Stars Blog Hop Badge3_zpsa824a544

Welcome to our monthly  
 Joyful Stars Blog Hop!!!!

We're excited to share our creativity with you using PRODUCTS from Close To My Heart!!  

Come on in and see what BEAUTIFUL projects my fellow consultants have creating using the AMAZING products from Close To My Heart!!

 This blog hop is easy to do…just click on the link at the end of the post to go to the next creation!! 
If you get lost along the way, CLICK HERE to see the list of this month’s hoppers! 
~~~~~~~~~~~~~~~~~~~~~~~~~~~~~
If you have arrived from Helen's blog you are right on track.   J

One of the best things of being a CTMH consultant, is the crafty friendships that are formed.  I am SO BLESSED to have gotten to know so many wonderful crafters, and because of this – we truly enjoy sharing artwork ideas together too!! 

2015-12-5_WYW_base and bling_ornament_set of 3 on tree_DSC_0727My project today is one that I saw from other consultants.  I’m not sure who the original designer was/is, but I do know that I am SO THANKFUL they shared this amazing idea!!! THANK YOU!! J

Take a look at this picture to see ANOTHER WAY to use Close To My Heart’s Base & Bling handcrafted jewelry line!!  Check out ALL the items in this base & bling line by clicking here


These ornaments were FUN to create & the PERFECT little goodie to give to my team members that joined me at the recent CTMH consultant event in King of Prussia. CLICK HERE to learn more about this FUN consultant only event. J
2015-12-5_WYW_base and bling_ornament_bright_DSC_0725
As far as creating these ornaments, I used the Artiste Cricut collection that is exclusively available through Close To My Heart. 

I also used circle punches (1”, 1 1/2”) but you could cut the circles on the Cricut machine too.

I would HIGHLY suggest using the Explore Air Cricut machine for this project if you have it!  If not, the regular Circuit machine will do. J 


How do I know this? J I tried these cuts on both of my machines.

The reason I suggest using the Explore is because of all of the “EXTRAS” the Explore does on these cuts!!!

FIRST – the carbide blade cuts the shapes & holes PERFECTLY, no ragged edges or white core showing through! 

THEN, it also SCORES all those fan folds for you!!! WAHOO!!!   I didn't realize the Explore machine did the scoring (yes, I’m still learning) until it asked for me to insert my score tool.  It saved SO MUCH TIME by doing all of my scoring for me!! 
 
The shapes I cut are all found on the KEY G of the Artiste cartridge.
Key G - Artiste_pinwheel and bow***PLEASE KEEP IN MIND****There are 6 different pinwheel flowers to choose from on the Artiste cartridge – so make sure to check out your other options before cutting the same shape I did on this key. J

Notice the orange shape on this key….this is the pinwheel flower.  So the finished piece at the #23 arrow?  You WILL NEED to cut TWO of these shapes (one for each side) to create your complete flower.  Set your dial at 1 1/4” to recreate the same size ornament I created.
2015-12-5_WYW_base and bling_CU Joy_20151204_231708
If you choose to add the bow to the top (some ornaments had the bow, others didn't) set your dial size to 1/2" and then fold it together like your Artiste booklet shows you.

The glitter circle under the base & bling pendent was 1 1/2" and I also cut a 1 1/2" cardstock circle for the back of the ornament where I stamped the Dec 5th date with our new roller date stamp. J

CJklVvBUwAAZx_NI used our 1" circle punch to cut the circle from the Base & Bling Holiday style sheets.(retiring by Dec 31st!)  They are already adhesive backed, so I just stuck this circle inside the pendent & then used liquid glass to adhere everything together!!!


Here are the steps once you have everything cut….

1. I glued the 2 folded fan-like flower strips together.

2. I glued the cardstock circle to the back of the created pinwheel. After this was dry, I stamped the date on the back with the roller stamp.

3. I glued the glitter circle on the front side of the pinwheel.

4. I stuck the 1” circle sticker in the pendent & glued the glass cover on top of the sticker.

5. I glued the actual pendent on top of the glitter circle and left it dry for a LONG time - overnight if possible!! I made sure to apply the glue very heavy on this part!! It seemed to take more glue to have it stick well to the glitter paper.

6. To complete the ornament, I added a ribbon & ta-da....completed!!
2015-12-5_WYW_base and bling_ornament_packaged_DSC_0730
Here is a look at my “trial run”….you have those when you create, right? I wanted to decide what was the best size to create for these base & bling pendants.  I really do like the other sizes too & may play around with those sizes later. 
2015-12-5_WYW_base and bling_different sizes1449273544968
I used the White Pines & Zoe paper packs.  White Pines will be leaving us at the end of this month, so make sure to get all the paper & accessories you need before it’s retired & gone!!
White Pines_2015 fall_PicMonkey Collage
Thanks so much for stopping by….hopefully this wasn’t too long of a post!!  I wanted to make sure I included all the details in case you wanted to create some of these ornaments on your own! J 

~~~~~~~~~~~~~~~~~~~~~~~~~~~
Now it’s time to Hop on over to my fellow sister consultant and check out my friend & teammate Stephanie's blog and see what beautiful, crafty item she has to share with us! J 

Happy Hopping and we’ll see you on the 9th next month, when the Joyful Stars team members will be sharing more artwork using Close To My Heart products!    


Blessings to you for BEAUTIFUL day!!!

Krista Hershberger J

Monday, July 21, 2014

Balloon Ride- CTMH 3 ring Kraft album

Kraft album_Balloon Ride_Artbooking_page 5 close up DSC_1205We only have 10 more days until the Retiring Items at CTMH will be gone!!

Please check & make sure that you have the items you need!!  CLICK HERE to see the most recent Retiring list!!


Come join me today, as we showcase another paper pack that will be leaving us at the end of July…Balloon Ride

I will truly miss the Balloon Ride paper!  These BEAUTIFUL neutral tones coordinate with about ANY theme!!

I wanted to showcase this paper collection & decided to use our FABULOUS My Creations Kraft 3-Ring Album as well.  With a price point of only $5.95, this album can be used for SO MANY things!! 


I had SO MUCH FUN creating this album!! J  Make sure to stop back for my next couple of blog posts to see how quick & easy this album was to create!!


Here were some “rules” I set for myself before I started creating…
  • no stamping allowed
  • no inking of edges
  • I chose to only use the 8” size cut from my Cricut machine when cutting ALL shapes
  • used the Artbooking Cricut cartridge exclusively
Kraft album_Balloon Ride_Artbooking_cover DSC_1228That’s not hard, right?  J
For me the NO STAMPING part was the hardest!! 

I do have to confess J…you’ll notice in the next post, I DID stamp one time in this book…I stamped lines on my cut out journaling page…but that was the only stamping I used! LOL!!


Take a look at the 1st batch of pages…(make sure to come back to this blog to see the final set of pages!)
It was so fun to add bits of glitter paper behind the cuts outs from the Artbooking Cricut cartridge! 
Kraft album_Balloon Ride_Artbooking_page 1DSC_1228
In creating this album, I started to use only the images from keys 1, 2, 3, & 4 of the Artbooking cartridge.  However, I realized if I kept my dial  size at 8”…it didn’t matter WHAT shape I used in this cartridge! J So I ended up using MANY shapes from the entire cartridge!!

The shape of this half page came from the zero key…
key 0_artbooking_balloon ride 3-ring album

Page 2- very simple…plenty of room for a picture or journaling…
Balloon Ride_kraft album_inside page

Page 3 & 4 - the wording is part of the zip strip from the top of the Balloon Ride paper pack! Kraft album_Balloon Ride_Artbooking_page 2 & 3 DSC_1228

It’s so fun to include a smaller tag in the middle of the album…it adds an extra touch!

Our Base & Bling charms can be used for SO MUCH more than jewelry!  While they do look adorable on our jewelry pieces, I have been using the rhinestone gems (used here) & all of the other charms on so many of my projects!!
Balloon Ride_kraft 3-ring album_tag pageDSC_1203 (2)

The overlays on our Artbooking Cricut cartridge are PERFECT for mini albums!!

Page 5…….For my sparkly circles - I used SCRAPS of Glitter paper!!  The perfect way to use up those pieces! J
Balloon Ride_kraft 3-ring album_bubble overlay page DSC_1203 (2)
We’ll pause here for today…J

As you can see the pages were put together VERY SIMPLY…but it still turned out to be a BEAUTIFUL book!!! (Close To My Heart paper always makes things beautiful! J)

Make sure to join me for my NEXT POST showing the rest of this album’s pages!!

Please take note ….of the list of items used in creating this book.  I used a LOT more items RETIRING than I realized!!

 You have until July 31st OR WHILE SUPPLIES LAST to purchase these retiring items!!

CLICK HERE to head over to my website to view these retiring items…

Fireworks& before placing your order, CLICK HERE to check out ALL the amazing July deals!!! 


Products used:
  • X7180B Balloon Ride Paper pack
  • Crème Brulee cardstock (retiring)
  • Sorbet cardstock
  • Crystal Blue Cardstock
  • Twilight Cardstock (retiring)
  • Z1906 Artbooking Cricut Cartridge
  • Z1871 My Creations Kraft 3-ring album
  • Z1830 Brown & Tan Glitter paper
  • Z1958 Craft Queen charms
  • Z1957 Free Thinker Charms (6 charms for only $3.95!)
  • Z1959 Storyteller Charms
  • Z1978 Rhinestone Charms
  • Z1930 Chocolate Woodgrain washi tape (retiring!)
  • Z1849 Bronze Shimmer Trim
  • Z1961 White marquee Enamel Shapes (retiring)
  • Z1928 Triangle Studs
  • Z1752 Brown & Tan Sparkle asst.
  • Z1921 Neutral Metallic Baker’s twine
  • Z1151 3D foam tape

Blessings for a beautiful day & come see again me soon for the details of the COMPLETED album in my next post!!


Krista Hershberger J


2014-7 July special with Krista_free complements