Showing posts with label Wooden Mini-Medley. Show all posts

Sunday, August 4, 2013

Artbooking in August~week 1

Are you ready to get creative?? 

Let 40 talented CTMH consultants inspire you with their creativity this month.  

Each Monday in August, these ladies will be posting artwork to their blogs and you can follow their blogs or set your alarm to make sure you do not miss a post! J
blog badge 2 copy
Our challenge was to create 4 different projects using the Cricut Artbooking cartridge and incorporate any CTMH paper pack.  ( yes - we all have retired paper packs in our 'stuff' and this cartridge is perfect for using up paper!!)  

Our mission was to design each of the following:
1. 2 page layout
2. Card
3. Mini Book
4. Home decor or giftable item


We are able to choose what to make and when to post it (in whatever order we choose)… AND if we wanted to add stamped images into our designs, that was o.k too!!


**** You will not want to miss any of this AMAZING and FANTASTIC artwork!!  So let’s continue on!!! J ****
~~~~~~~~~~~~~~~~~~~~~~~~~~~~~~~~~~~~~~~~~
If you have come from Mary Gunn’s Blog…you are on the right track! 


For my 1st week of this hop, I chose to create a CARD using the Artbooking Cartridge! 
Card making is my FAVORITE thing to craft, and I had so much FUN creating this card!!!Artbooking_corn stalk_card DSC_2263
There are SO MANY overlays for scrapbook pages on this Artbooking cartridgeBUT they are NOT just for LAYOUTS!!!  Resize these overlays, and they make WONDERFUL card fronts too!!!J

I used Kraft cardstock to create the overlay on my card.  This is shown on page 82 of the Artbooking cartridge– the “All Boy” key. 

I made sure to use my “REAL DIAL SIZE” (RDS) key to resize this to card size and set if to 4 1/4” inches. This did create the correct width of this overlay, but I did cut off some of the length….

  Now – keep in mind – Cricut Craft Room (CCR) will be a FABULOUS asset to this Artbooking cartridge…but I created this card prior to the Aug 1st release and did not use CCR to create this overlay.

(for more info on CCR…click HERE…it’s a FREE resource to use with your Cricut machine!!!)
Artbooking_corn stalk_card_corn cob pop DSC_2263
Do you see how the overlay is “popped” off the card base?

I used our NEW jute ribbon under one strip of the overlay….and then cut a olive and barn red color cardstock strips for some of the other sections.  I used 3D foam tape to “pop” the entire overlay off the front of the card!

 
Artbooking_corn stalk_card_corn cob straight on DSC_2263

Next, I wanted to stamp a main focal point using the “Count Your Blessings” stamp set.  If you take a look at the stamp set(by clicking on the highlighted words) …you will notice there is only ONE corn cob on this corn stalk…I added another cob for some more color.J

I cut the word “Autumn” from the N key on page 73 of Artbooking Cartridge. 

I used CTMH’s pigment ink (Cocoa) to stamp the corn stalk image…and them used our alcohol markers to finish coloring it in.

The designer paper behind the cornstalk comes from the Huntington paper pack…and I sanded the edges to give it a more rustic look.


One last look at the card

Did you notice the burlap background, the fabric flower in the bottom left corner, and the chicken wire frame…
you’ll want to make sure to stop back at my BLOG in the coming weeks for more details on these FABULOUS new items!!!
Artbooking_corn stalk_card on burlap backgroundDSC_2263
 
Products Used on Corn Stalk card…
 
Now, hop on over to Kimberly Hill’s Blog to see what she has created using this NEW Artbooking Cartridge!!

If you get lost along the way CLICK HERE to view the entire list of Artbooking creators! 


Happy Hopping and make sure to JOIN US again for the REMAINING MONDAYS during the month of August!!!  There will be NEW artwork using the Artbooking Cartridge posted each Monday!!

 
Blessings to you for a WONDERFUL day!!!
Krista J


Tuesday, April 16, 2013

I’m SO EXCITED…part 2!

If you missed Part 1 of this post - CLICK HERE to see what the excitement is all about! J
If you are joining me again and are curious about the rest of the artwork I submitted to corporate…keep on reading!!!

Today I will be sharing the 2 page layout I submitted to Close To My Heart as part of my application to teach at Convention this year.
Surfs Up layout_beach_extravaganza submission
I had a LOT of fun, adding many details to these pages! 
Let’s take a closer look at all the different aspects of this layout! J

I wanted to add some “texture” to the base pages of this layout…
To do that, I used our NEW stamp set Distressed Backgrounds. I took the mess like stamp, and inked it up in Lagoon colored ink, and stamped it on top of my Lagoon colored base pages!!Surfs Up layout_beach_close up background title
Do you see the dots also on the base page???  I sprayed these pages with a spray pen that was filled with re-inker, pearl paint and water!!  I LOVE the effect this gives the project!!

For the title, I used the Artiste Cricut Cartridge font for the “fun”, but chose to use our NEW Keyboard Kraft Alphabet letter stickers for the word “Beach”.

Next, I created my journaling tag…Surfs Up layout_beach_extravaganza submission_lose up journaling
by using the Artiste Cricut Collection, I created my own pocket for journaling AND a card to stick inside!!!
Check out all that you can do with the “U” button of the Artiste Cartridge!! 
U key- Artiste
On this journaling tag, I also used the Tropical Paradise stamp set, and the Wooden mini-medley collection to add some color and texture.

My FAVORITE part of the layout, is this sun!!!
Surfs Up layout_beach_close up_sun bakers twine
It’s almost embarrassing to tell you how simple it was to create!! J Believe it or not, this sun is part of the My Stickease collection that coordinates with this Surf’s Up paper pack!!!
I will often use MY STICKEASE in my creation….and I love to “doctor up” these sticker images!!! 
For the clouds, I sponged the edges in ink. 
The sun, I used 3D foam and “popped” it up.  I also used the twine that comes in the Wooden Mini-medley asst pack and some liquid glass to make sure my twine stayed twirled.  Then I took some of our glitz glitter gel to add some sparkle to my beautiful sunshine!!

This layout gets me excited for our upcoming summer!  I LOVE to feel the sunshine on my face, and am so relaxed by the beating of the waves on the sand….I can hardly wait! J

That’s all for now, but I look forward to sharing the REST of the items with you that I submitted to corporate later on this week!!!! 

Come on back and I look forward to seeing you soon!!!!

Blessings to you!

Krista J


There are TWO April specials taking place this month…

1. The April Stamp of the Month(SOTM)

Purchase this EXCLUSIVE stamp set for just $17.95(this stamp set is ONLY available until April 30th!)

OR

Place a $50 CTMH order(prior to shipping & tax) and Pay ONLY $5.00 for this ADORABLE stamp set!!

****To see the card I created using this set CLICK HERE…


2. Sign up and CELEBRATE!!!


Join my Close To My Heart family in April
and receive ALL that’s pictured below for ONLY $49!!!

This is the PERFECT time to join my creative family…what do you have to lose?J


I have a spot reserved in my creative family for EVERYONE and ANYONE who loves Close To My Heart!


Please Contact me with questions you may have about joining our family OR Click here  for more information on how you can join my team today! 


I’d LOVE to share with you the MANY different ways you can choose to be a CTMH Consultant! J


Monday, February 18, 2013

Surf’s Up cards

I chose to use the new Surf’s Up paper for a recent swap I was in!!! 
Surf's Up paper X7168B
If you missed the first post explaining the details on how I created the 12x12 page…CLICK HERE

For those of you that have returned and are anxious to see details about my other Surf’s Up items, come on in! J I will be sharing details on another card today!!!

Here is a picture of ALL the items I created for the swap…
Surf's Up_5 pieces_Karen Morris swap


Today, let’s take a look at the tropical palm tree card!
Surf's Up card_palm tree
I love the variety of colors associated with the Surf’s Up paper pack.  On this card, I chose to pull out ONE of the designed papers from this paper pack and added cardstock to incorporate more colors into this card creation.

For those that know me J, you know I enjoy making my items looked distressed.  This is SO EASY to accomplish  with Close To My Heart products…all of our cardstock & designer paper are white-cored – meaning that in the middle of our papers there is WHITE that you can chose to have come through.  You can tear your paper, so the white shows.  You can sand it or you can chose to leave it as it is! 
So…when I wanted to emboss lines into my cardstock, I embossed,and than sanded that design – ta-da – I have created a TOTALLY new look with my chocolate cardstock!!!


The Ponderosa Pine cardstock was distressed using our affordaedge distresserble, handy tool called our Edge Distresser
At only $2.50 each, you’ll want to make sure to have this in your tool kit so that you can “shave” your cardstock edges…giving them a roughed up look.


I LOVE the new stamp set that I used for this card…Tropical Paradise
Tropical Paradise stamp set

The palm tree comes all as one stamp, so HOW did I get the varying colors???
CLEAR STAMPS are the BEST – it’s SO EASY to ink your stamps in different colors prior to stamping!!!
Surf's Up card_palm tree_close up tree
Can you see where I inked the Ponderosa Pine and chocolate inks on the palm tree?  I wiped ink OFF of the flower at the bottom of the tree, and stamped the tree on my paper. 

THAN, I cleaned my palm tree stamp, and inked just the small flower at the bottom in sorbet ink and stamped it…giving us a sorbet colored flower. J


Here’s a close up of the bottom section of my card…
Surf's Up card_palm tree_close up
Did you notice the “glass dots”?  I LOVE adding Liquid Glass to a creation, to give it a “little extra”.  Liquid Glass is ALSO a GREAT glue/adhesive!!!  It is a “MUST” to have Liquid Glass whenever I am creating! J

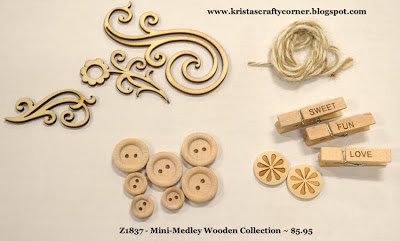
The twine, and wooden button come from our NEW Wooden mini-medley…a wonderful variety of neutral colored embellishments.

I hope you are encouraged and EXCITED to purchase some of your own Surf’s Up paper!!  There are SO Many ways to use this paper pack – and NOT just for your summer photos! 
Come back and join me for details on my “NON-Summer” card that I created with this paper pack!!


In the meantime, you will want to take a moment and check out Studio J program, our online, FASTER but BEAUTIFUL digital scrapbooking option!!!

 
 During the month of February, Close To My Heart is having some AMAZING deals!!!

 Studio J 2 page layouts ONLY $5.00 !!!
Feb-CC-ImageGallery

This is the PERFECT opportunity to get MULTIPLE scrapbook pages created to help complete your albums faster!!!  What an AMAZING tool to be able to create a layout in as few as 10 minutes!!!

 Click HERE to start your QUICK & EASY digital layouts NOW!

CLICK HERE if you’d like to learn MORE about Studio J before giving it a try.J 

~~~~~~~~~~~~~~~~~~~~~~~~~~~~~~~~~~
2013 February SOTM _0213_SOM
(purchase this EXCLUSIVE stamp set for retail price of $17.95
OR pay ONLY $5 with a $50 order!)


Be sure to click the join button when placing your order. J 


 I LOVE to hear your thoughts and comments on what you’d like to see on my blog!!! Your thoughts and ideas are so helpful!!J   Looking forward to talking again soon!!

Blessings to each of you!!!
Krista J
Thursday, January 31, 2013

February 2013 Stamp of the Month Blog Hop

Welcome to our
Stamp of the Month Blog Hop!


This month we are featuring  Close To My Heart’s February 2013 SOTM, which is called “Home Sweet Home” a set of 4 stamped images! 
Here is a picture of the stamp set!!
2_13_SOM_image
Can you picture the MANY scrapbook pages, cards, 3D creations – you can create when using this set?? 

How about just pulling one word out of this set – “comfort”, “you”, “home”, etc…and using that word rather than the entire stamp???  Just a few things that are in my mind until I have more time to create! J

If you have come here from 
Angela Tutton’s BLOG, you are on the right path! 

This month we have 63 Close To My Heart Consultants sharing their creations using this month's SOTM!!
~~~~~~~~~~~~~~~~~~~~~~~~~~~~~~~~~~~~~~~~~
Here is the card I chose to create this month!!Home Sweet Home_2013 Feb SOTM blog hop
I used one of our NEW paper packs, Claire
I LOVE the colors in this paper pack, and had a lot of fun creating this card!!!

Did you notice the BACKGROUND of this card???  Yes – it is stamped with one of our NEW background stamp sets!!  I used the NEW stamp set ~ D1544 Distressed Backgrounds. 

I used the mesh background on this card…but this stamp set also includes a houndstooth print and chicken wire print!!!  LOVE!!!
A few close ups…
 Home Sweet Home_2013 Feb SOTM blog hop_close up fussy cut image
I used our Artiste Cricut cartridge to create the “rosette” or “yo-yo" flower (not sure of the proper term- LOL!) behind the fussy cut, “Home Sweet Home” saying. 

Size was 1 1/2” flower, shift, 3D object, key P…on page 50.


I also used the NEW stamp set “Girls Rock”…this has QUICKLY become a new favorite of mine! I love the flowers in this stamp set!
Home Sweet Home_2013 Feb SOTM blog hop_close up clear flower
It coordinates with our Art Philosophy Cricut cartridge making it even QUICKER to create a layout or card with these precut flowers!!!

Once I stamped the flower in Outdoor Denim ink, I added one of the NEW Claire assortment clear flowers on top!!

Take a look at what comes in this Claire Asst.
Claire assortment_in detail
One last NEW embellishment item I used…the twine from the NEW Wooden Mini-medley set. I will be using this twine often in upcoming creations! J 

Take a look at the VARIETY of items included in this mini-medley...GREAT choice CTMH!! 


Now it’s time to move on to Mary Eisen’s Blog to see what she has created with this stamp set!!

Happy Hopping!!!

Blessings to you,
Krista J