Tuesday, December 29, 2015

Kaleidoscope Scrapbook Pages- CTMH

Have you taken notice of the Kaleidoscope paper collection from Close To My Heart? 
 
Such bright, fun colors to work with!!
 

 My monthly group of ladies, enjoy creating scrapbook pages….so I needed to create some of my own pages, since there was not a Workshop kit that CTMH created for this paper collection. J
 (But you'll want to take note of the ADORABLE Kaleidoscope cardmaking kit they DO have available!!)


Here are the layouts I created…
 
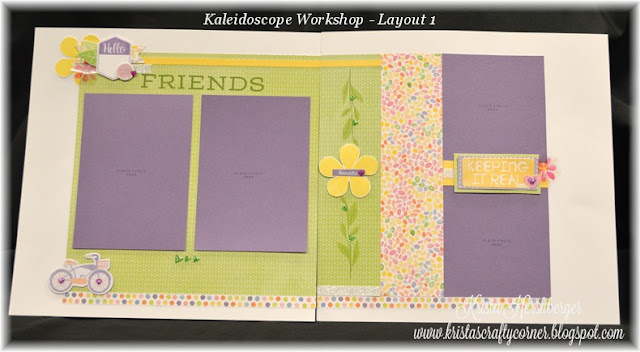
Layout 1 was created from a  layout design that CTMH gave us at this summer’s 2015 Convention. 
 
I wanted to use only colors from the Kaleidoscope paper collection – so I needed to trade out some cardstock colors compared to the original CTMH layout, to make this happen.


While I do like the “original” layout & colors by CTMH, I was really excited how this layout turned out by only using the colors included in the Kaleidoscope paper collection.


As I was creating these set of layouts, I wanted to use the coordinating Kaleidoscope Complements on all three layouts, so I incorporated these fun goodies in each layout as well. 


Let’s take a close-up look at some of Layout 1 details.
 
  We did some stamping on this 1st layout, and I “copied” directly from the CTMH layout.


Check out the “flowers” we created with this stamp set, we used the leaf stamp image from the FRIEND TREE stamp set!!  I LOVE to use stamp images in ways we don’t think about – and that’s how we created this flower!!
 
Below, the bicycle needed some glitter hearts and the dotted strip of paper is a  “zip-strip” that’s an “extra goodie” included with CTMH paper collections!!


Here is layout 2….we used Pear cardstock as our base pages.
 

Let’s see a few close ups of this page…


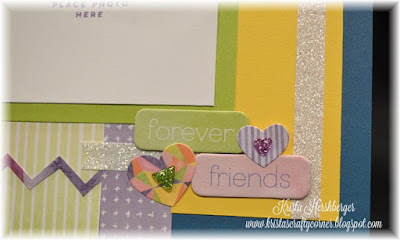
The large diamond is a sticker that comes in the Complements collection.  I mounted that on a scrap piece of canary cardstock & then cut a piece of white shimmer trim to give it some sparkle.
 
Also, note that the clear stickers were used just like they are. (check out layout 3 for another way to use the clear stickers)


I used a mixture of the 3D shapes, stickers & added white shimmer trim to give it some pop!
 
It’s fun to dove-tail the shimmer trim OR just cut it off on an angle!!  This is ONE product that I use all the time, you can use it in so many ways!!


Layout 3 was created using Pattern 3, from our Make It From Your Heart #2 how-to- book. 
 
As I mentioned above – this time….take note of the “clear stickers” on this layout.  These "clear" flower stickers are no longer clear, but I mounted them on white daisy cardstock & then cut them out to place them as accents on the layout!! 
 
Here is a close-up of the title of this page…


Again, I added the "fun day" sticker to a piece of scrap gypsy cardstock.  and added a piece of shimmer trim behind the title.  

The tie dye zig zags are a sticker, but – since I don’t like to waste anything J…I cut another set of zig zags out of the negative space & used that on the right side of this layout too!!


By clustering many elements together, you get a really neat scrapbook page!!
 
----------------------------------------------------------------------
 
 
Here are the materials I used on this set of 3 Kaleidoscope layouts.


X7202B Kaleidoscope paper pack
X7202C Kaleidoscope Complements
3 extra sheets of colored cardstock (2 Pacifica, 1 Pear)
2 sheets of additional White Daisy CS (for photo mats)
4 ½” x 5 ½” Pear photo mat
E1032 Typography Alphabet
D1677 Friend Tree
Z3024 White Shimmer Trim
Z3123 Green Triangle Enamels AND/OR  Z3124 Purple Heart Enamels
Z2643 Canary Ink
Z2153 Sweet Leaf ink
Z2155 Topiary ink
Z2197 Pear ink
Z2190 Gypsy ink


Would you like to create your OWN set of Kaleidoscope pages??? J

When you purchase $30 or more on my CTMH website, I will email you the directions & my tips to create these 3 sets of layouts for FREE!
 
Please contact me & let me know you are interested in these directions, after placing your CTMH order


Thanks so much for stopping by!!
Happy Creating & have a wonderful day!


Krista Hershberger 
J
Close To My Heart Independent Consultant
clip_image002Celebrating 9 years with Close To My Heart!
The perfect place for ALL of your Scrapbooking, Stamping, & Papercrafting Needs!


Friday, December 25, 2015

Friday, December 18, 2015

Check out this BEAUTIFUL Planner OR use as a mini-album too!

Oh what FUN I’ve been having with my NEW CTMH planner!! I have used a datebook/planner faithfully, year after year – and this is the FIRST time I’ll be using a “pretty” planner!


AND…I hope you heard about the GREAT deal CTMH is having in December on these new planners!!

When you purchase our NEW planner BUNDLE you will be saving 15% !!!!Wahoo!! 


In the bundle YOU RECEIVE:


A perfect gift for you OR for someone that enjoys being organized & planning as much as you do!!


Let’s take a look at some of the close ups & details about this beautiful planner system.


The monthly page….


Here are the DAILY pages….LOVE that you can write things for each day.


Now maybe you are all set for 2016….BUT you like the possibilities of the MANY ways you could use a beautiful mini-album.  The coordinating items have been PRE-RELEASED and can be purchased separately too!!! 
I LOVE the possibilities of this mini album!! 


Here are the Everyday Life™ items, listed separately…  

To fill up your album, the Everyday Life line will also include:

·The Everyday Life album ($10.95), a beautiful, black three-ring album with gold foil design that measures 9 3/8” x 8 ¼”. This album size makes the album multi-purpose, allowing you to decide what you put in it.

 Everyday Life Album


The Everyday Life 2016 planner pages ($15.95): 154 planner pages, 12 monthly dividers with tabs, a pocket folder page, a designed page finder, and four sheets of stickers. With monthly and weekly spreads and printed dates, these pages have all the features you need to stay organized—and look good doing it!


· Everyday Life Perfect Plan roller stamp ($8.95): This fun and functional roller stamp coordinates perfectly with the label stickers, enabling you to customize your planner even further.


· My Crush® Everyday Life pages ($7.95 ): A set of 60 double-sided, gorgeous My Crush pages. These pages can be used on their own to create a beautiful My Crush book, or they can be combined with the planner pages to give you more room in your planner for preserving your memories while giving your planner even more flair.


· Everyday Life Washi Tape ($3.95): because every My Crush book needs a good washi for attaching photos and other memorabilia to your pages.


· Memory Protectors ($6.95): we’re introducing TWO new styles of pocket memory protectors sized to fit into the Everyday Life album.                                   One will have two 4” x 6” pockets, the other four 4” x 3” pockets. Use these to add your favorite Picture My Life™ cards and photos into the mix!


So, what are YOU planning to do with these beautiful new CTMH products?  I can't wait to hear about YOUR ideas!!! J 

Thanks so much for stopping by!!  Have a wonderful day!


Krista Hershberger 
J
Close To My Heart Independent Consultant
clip_image002Celebrating 9 years with Close To My Heart!
The perfect place for ALL of your Scrapbooking, Stamping, & Papercrafting Needs!


Wednesday, December 9, 2015

Christmas Ornaments - Joyful Stars Blog Hop

Joyful Stars Blog Hop Badge3_zpsa824a544

Welcome to our monthly  
 Joyful Stars Blog Hop!!!!

We're excited to share our creativity with you using PRODUCTS from Close To My Heart!!  

Come on in and see what BEAUTIFUL projects my fellow consultants have creating using the AMAZING products from Close To My Heart!!

 This blog hop is easy to do…just click on the link at the end of the post to go to the next creation!! 
If you get lost along the way, CLICK HERE to see the list of this month’s hoppers! 
~~~~~~~~~~~~~~~~~~~~~~~~~~~~~
If you have arrived from Helen's blog you are right on track.   J

One of the best things of being a CTMH consultant, is the crafty friendships that are formed.  I am SO BLESSED to have gotten to know so many wonderful crafters, and because of this – we truly enjoy sharing artwork ideas together too!! 

2015-12-5_WYW_base and bling_ornament_set of 3 on tree_DSC_0727My project today is one that I saw from other consultants.  I’m not sure who the original designer was/is, but I do know that I am SO THANKFUL they shared this amazing idea!!! THANK YOU!! J

Take a look at this picture to see ANOTHER WAY to use Close To My Heart’s Base & Bling handcrafted jewelry line!!  Check out ALL the items in this base & bling line by clicking here


These ornaments were FUN to create & the PERFECT little goodie to give to my team members that joined me at the recent CTMH consultant event in King of Prussia. CLICK HERE to learn more about this FUN consultant only event. J
2015-12-5_WYW_base and bling_ornament_bright_DSC_0725
As far as creating these ornaments, I used the Artiste Cricut collection that is exclusively available through Close To My Heart. 

I also used circle punches (1”, 1 1/2”) but you could cut the circles on the Cricut machine too.

I would HIGHLY suggest using the Explore Air Cricut machine for this project if you have it!  If not, the regular Circuit machine will do. J 


How do I know this? J I tried these cuts on both of my machines.

The reason I suggest using the Explore is because of all of the “EXTRAS” the Explore does on these cuts!!!

FIRST – the carbide blade cuts the shapes & holes PERFECTLY, no ragged edges or white core showing through! 

THEN, it also SCORES all those fan folds for you!!! WAHOO!!!   I didn't realize the Explore machine did the scoring (yes, I’m still learning) until it asked for me to insert my score tool.  It saved SO MUCH TIME by doing all of my scoring for me!! 
 
The shapes I cut are all found on the KEY G of the Artiste cartridge.
Key G - Artiste_pinwheel and bow***PLEASE KEEP IN MIND****There are 6 different pinwheel flowers to choose from on the Artiste cartridge – so make sure to check out your other options before cutting the same shape I did on this key. J

Notice the orange shape on this key….this is the pinwheel flower.  So the finished piece at the #23 arrow?  You WILL NEED to cut TWO of these shapes (one for each side) to create your complete flower.  Set your dial at 1 1/4” to recreate the same size ornament I created.
2015-12-5_WYW_base and bling_CU Joy_20151204_231708
If you choose to add the bow to the top (some ornaments had the bow, others didn't) set your dial size to 1/2" and then fold it together like your Artiste booklet shows you.

The glitter circle under the base & bling pendent was 1 1/2" and I also cut a 1 1/2" cardstock circle for the back of the ornament where I stamped the Dec 5th date with our new roller date stamp. J

CJklVvBUwAAZx_NI used our 1" circle punch to cut the circle from the Base & Bling Holiday style sheets.(retiring by Dec 31st!)  They are already adhesive backed, so I just stuck this circle inside the pendent & then used liquid glass to adhere everything together!!!


Here are the steps once you have everything cut….

1. I glued the 2 folded fan-like flower strips together.

2. I glued the cardstock circle to the back of the created pinwheel. After this was dry, I stamped the date on the back with the roller stamp.

3. I glued the glitter circle on the front side of the pinwheel.

4. I stuck the 1” circle sticker in the pendent & glued the glass cover on top of the sticker.

5. I glued the actual pendent on top of the glitter circle and left it dry for a LONG time - overnight if possible!! I made sure to apply the glue very heavy on this part!! It seemed to take more glue to have it stick well to the glitter paper.

6. To complete the ornament, I added a ribbon & ta-da....completed!!
2015-12-5_WYW_base and bling_ornament_packaged_DSC_0730
Here is a look at my “trial run”….you have those when you create, right? I wanted to decide what was the best size to create for these base & bling pendants.  I really do like the other sizes too & may play around with those sizes later. 
2015-12-5_WYW_base and bling_different sizes1449273544968
I used the White Pines & Zoe paper packs.  White Pines will be leaving us at the end of this month, so make sure to get all the paper & accessories you need before it’s retired & gone!!
White Pines_2015 fall_PicMonkey Collage
Thanks so much for stopping by….hopefully this wasn’t too long of a post!!  I wanted to make sure I included all the details in case you wanted to create some of these ornaments on your own! J 

~~~~~~~~~~~~~~~~~~~~~~~~~~~
Now it’s time to Hop on over to my fellow sister consultant and check out my friend & teammate Stephanie's blog and see what beautiful, crafty item she has to share with us! J 

Happy Hopping and we’ll see you on the 9th next month, when the Joyful Stars team members will be sharing more artwork using Close To My Heart products!    


Blessings to you for BEAUTIFUL day!!!

Krista Hershberger J