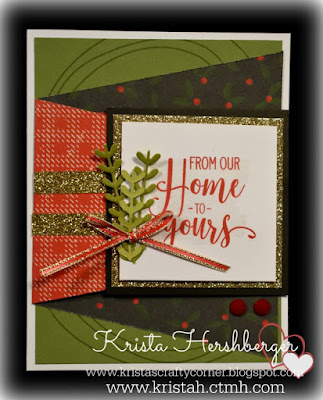
A week or so ago - I shared a "sneak peek" at a card I was making for my home party that night. Then, remember the SNOW storm that came to my area?? Yup - that 6" postponed the party until tonight!
To begin creating this card, I was looking through my stamp sets...and realized I hadn't yet used the Tis the Season - Scrapbooking stamp set!! Well, I decided to change that, and started brainstorming on how this "scrapbooking" stamp, could be used on a CARD design.
Well, I came across this card design was from my friend & fellow consultant, Tina Lovell. What a talented lady she is! I loved the card design she used for a card she made in the past, so I took her design & changed it into a Christmas card!
It's always FUN to change up a card's function in opening...and I was determined to create something different for my cardmakers tonight....because some of them are close to "expert" level & I love to learn new things from them! Tonight, I'm hoping that I can teach them something too!
One "fun part" about this card....notice the RED ribbon...Do we HAVE red ribbon with gold running through it???
No----- we don't have red ribbon :)
....HOWEVER....anything this is WHITE, can be made colored with our ShinHan Alcohol markers! Wahoo!! LOVE this feature of our markers!
....HOWEVER....anything this is WHITE, can be made colored with our ShinHan Alcohol markers! Wahoo!! LOVE this feature of our markers!
And look at those BEAUTIFUL sprigs!! Yes...these are from my FAVORITE product in this Holiday Expression Idea book - the Decorative Border Thin Cuts (metal dies) I am AMAZED at how much I use these cut designs!! Love - LOVE them!!
And let's take a look at the inside of this hinge card design....
Do you see how this opens?? With our sturdy, but BEAUTIFUL designer paper, creating this card was a snap!
The branch of leaves was from the Tis the Season- Scrapbooking stamp, ( I used New England Ivy ink to stamp it) and this was just the touch that the writing section inside needed!
Tina shared with me to cut the paper at 7 1/4 in length....
Next to cut the "triangle - that's not really a triangle piece - LOL!!
the left side is 1 3/4" tall
the RIGHT side is 5" tall.
I just played around with it, until I got the cut I liked, using my paper trimmer to cut these diagonal lines. :) I didn't realize how much I'd like this card....I should have taken pictures of my creating along the way! :)
The words on the front & the inside of the card, all came from the October Special stamp set - Love with all the Trimmings.
This stamp set can STILL be purchased as part of the Holiday Sparkle cardmaking kit - HURRY - it is a While Supplies Last item!!
I hope this inspired YOU to create & maybe even gave you a few ideas too!
If you'd like to recreate a similar card, I've listed the card ingredients below.
Products used in this card...
D1801 Tis the Season - Scrapbooking stamp
D Love with All the Trimmings stamp
D Love with All the Trimmings stamp
X7239B - Tis the Season Paper pack
X7239D Tis the Season Coordinating Cardstock
X6028 Black Cardstock
Z4241 Decorative Border thin cuts
Z3238 Gold Glitter Paper
Z2448 ShinHan marker - Carmine
Z1985 Gold Shimmer Trim
Z4194 White & Gold Skinny Ribbon
Z3090 Red Enamel Gems
----------------------------------------------------------------------
Blessings to you for a WONDERFUL day!
Blessings to you for a WONDERFUL day!
Krista Hershberger
Close To My Heart Independent Consultant
Celebrating 12 years with Close To My Heart!
The perfect place for ALL of your Scrapbooking, Stamping, & Papercrafting Needs!
PHONE/TEXT: 610-587-9116
EMAIL: kristascrafty@gmail.com


No comments :
Post a Comment
Thanks for taking time to make a comment!
Blessings to you for a BEAUTIFUL day! :)