Showing posts with label Overlays. Show all posts

Saturday, October 1, 2016

October SOTM blog hop - Yuletide Joy

Welcome to our monthly Stamp of the Month (SOTM) Blog Hop!!!

If you have come here from Tracie's  Blog, you are on the right track!!

This month, we will be featuring the EXCLUSIVE October SOTM stamp set called “Yuletide Joy”.

This blog hop is a great big circle, so you can START HERE & work your way around to the many consultants on this “hop”! If you get lost along the way, you’ll find a complete list of PARTICIPATING CONSULTANTS by clicking HERE

This month we have 37 Close To My Heart Consultants that will be sharing items using this month’s stamp set.  So, sit back & enjoy your tour as you click on the link at the end of each post to see what EVERY consultant has created.  
~~~~~~~~~~~~~~~~~~~~~~~~~~
So, would you like to see the stamp set? 
It's a beautiful one...take a look!


When I saw this stamp set, I knew I had to bring out the heat embossing tool...and out it came. :) 


A very simple card, taken from the pattern design of one of our current card workshops..."WYW Happy Holidays Cardmaking Kit".  I was also inspired by my fabulous friend Gina Brandstetter & her amazing card she created with our new overlays.    

Let's talk about those overlays!  I took this picture with a glare - on purpose! :)  That way, you can see how this reflects light & adds a bit of shine to this Christmas card.  

Did you know that CTMH has a WONDERFUL pack of 12x12 overlays that can be cut to the size that you need?  
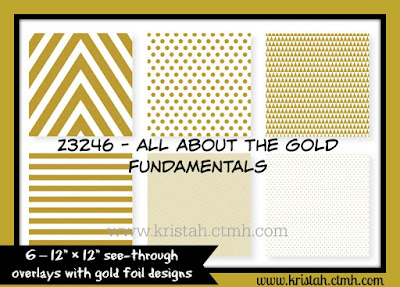

In our Annual Inspirations Idea Book, you can find the "All About the Gold" Fundamentals paper....here are the pattern designs included in this kit, and keep in mind these are ALL overlays (just like transparencies)   


The red arrow paper in this card design, comes from our Swan Lake paper collection.  This paper is perfect for so many occasions!
   
I backed the gold embossed star with SEA GLASS cardstock (eeek...I adore this "COLOR of the YEAR" shade), and mounted it with some 3D foam tape. 

I used clear sparkles & then colored them red with my ShinHan alcohol markers! Yes - alcohol markers can be used to change the color of anything...shimmer trim, sequins, sparkles & more! 

I hope you are enjoying this blog hop & are getting LOTS of ideas for when you get your own set of this months’ SOTM stamp set.  Happy Crafting to each of you! 

Now – it’s time to head over to Jen's blog to see what FABULOUS items she has created using this stamp set!

Be sure to visit ALL the Consultants at their blogs to get some GREAT crafting ideas!!  We always love to hear any feedback you’d like to share as well, so feel free to leave a comment below. 

****Remember*****
The October SOTM – ”Yuletide Joy” – is ONLY available until October 31, 2016.
It can be yours at the retail price of $17.95 OR pay ONLY $5 when you purchase $50 in CTMH products this month!!!

Contact your CTMH Consultant (or click here if you need a consultant ) to answer any questions you many have. 

Blessings to you for a WONDERFUL day!!!
Krista 

Tuesday, November 26, 2013

Christmas Card Making Day 2013!!! - post #1

Our 6th Christmas Card Making Day
in Lancaster County!!! 

Yayyy!!! 
Christmas Card Making Day 2013_display-christmas DSC_0055

We had a WONDERFUL day creating Christmas Cards in late September!! 

 THANK YOU to EACH one of you that joined us this day!!  We enjoy making this day a special event of Christmas card crafting each year!!! 

To start our day, everyone registered when they walked in the door and then they were directed to the goodie bag table.  J Devyn greeted them there, and gave them a special bag that they would later put their created masterpieces (cards) inside.

Inside each bag was a variety of pre-cut Cricut pieces that were cut with our NEW Artbooking Cricut cartridge!Goodie bag table_Christmas Card DAy 2013 IMG_8916


Here is a sample of the pieces that were included in each bag. 

goodie bag items_christmas card making day 2013 IMG_8917
One of the WONDERFUL features of CTMH Cricut cartridges is that many of the Cricut cut images, have a stamp set that coordinates with it!!! 

For instance, the doily stamp in the bottom left corner(shown above)…this shape was cut out with the Artbooking cartridge, and then we stamped the beautiful doily on top of the cut out piece!! 

This is just ONE of the EXCLUSIVE (you can’t purchase separately) stamp sets that is included in the Artbooking Bundle!!

Artbooking_Sweet and Lovely stamp set image

There were ALSO pieces in their bags to create the 3x3 card shown in this picture. 
Artbooking 3x3_overlay_snowflake IMAG0800
This card incorporated one of the new OVERLAYS that make the Artbooking Cricut Cartridge unique to itself!!

goodie bag items_christmas card making day 2013 IMG_8917


These were all the Cricut pre-cut items in everyone's bag.  In their spare moments throughout the day, each person took time to come back up to this table to stamp their tag, card, banner, etc. and then could take those items with them.


Next, each person created a TAG to attach to their bag.  This would help us know whose bag is whose! J
tag for goodie bag_Christmas card day 2013 IMG_8918
TAKE A LOOK at the variety of tags!!

The tag shape was cut from (that famous) Artbooking Cricut cartridge.

The stamped images came from the new stamp set called Candyland
The small wording “Merry Christmas” comes from a FAVORITE stamp set called “Holiday Tags”. 


The place where we meet is an older fire hall, complete with interesting, decorative, 50’s wallpaper! J
Christmas Card Day 2013_decorations 3 IMG_8904

How did our day work??

We had 5 tables around the room.  Each table had a group of 6 ladies. This group of ladies stayed together the entire day as they rotated clockwise to each of the 5 tables, creating a new item at each table.

Our sessions were 30 minutes long, so we created 5 cards in the morning, and 5 cards in the afternoon for a TOTAL of 10 cards created during the day…plus the tag, and goodie bag items J


Let’s take a look at the beloved – DOOR PRIZE table!

Each person at Card Making Day went home with a door prize!  It may have been a handcrafted item, or a product from CTMH…there were MANY items to chose from!!!Door Prize table_Christmas Card day 2013 IMG_8908

The GRAND PRIZE of the day was the Frosted Card Making kit!!!  With a retail total of $24.95, EVERYONE was excited at a chance to win!!!  Everyone’s name was put into the pot – to have a chance at WINNING this kit and the final prize was drawn at 3:30 that day!!!


If there was any extra time throughout the day…we had a table set up in middle where anyone could stamp sentiments inside their cards, on their envelopes, etc.

*****A new, exciting part of Christmas Card Making Day this year, was the opportunity to purchase handmade cards! 

My team of consultants donated these cards, and then 100% of the proceeds went to Operation Smile!!
Operation Smile table_Christmas Card Day 2013 IMG_8906

Here you see a few attendees taking time to look through the donated cards from my fellow teammates!  Thank you so much ladies for the card donations…and a HUGE thank you to those that purchased the cards too!!
Christmas Card Making Day 2013_Operation Smile Card table DSC_0061
We raised a total of $86 for the kids at Operation Smile!!!  Wahoo!!! 

Close To My Heart is partnered with Operation Smile®, an organization that provides free, life-changing surgery that repairs smiles and reshapes lives, one child at a time. 

If you’d like to learn more about Operation Smile please CLICK HERE and know that you are welcome ANYTIME to round up or donate money on any CTMH order that you place!! 


Here are a few more displays that we had set up to create our Christmas atmosphere….
Christmas Card Day 2013_decorations 2 IMG_8904


Christmas Card Day 2013_decorations 1 IMG_8904

and finally…a HUGE thanks goes to our kitchen crew of the day. 

We had breakfast snacks (homemade donuts!) and the “traditional” lunch of taco soup with a variety of side dishes to compliment this treat. 

Many of us helped in the kitchen throughout the day, but Darla & Aymee were the ones that kept everything going!  We couldn't have completed this day without you two!!!  THANK YOU!!
Kitchen crew_Christmas Card day 2013 IMG_8910

I hope you enjoyed the quick view of what our day was like…

I ENCOURAGE you to check back here at my blog in the near future  J to see details on all TEN items we created during at our Christmas Card Making day!!!!

Blessings to you for a wonderful week!!
Krista J

Sunday, August 18, 2013

Artbooking in August Blog Hop - week 3

blog badge 2 copy

Welcome to week #3 of the Artbooking in August Blog Hop!


Today is our THIRD week to share with you items created with Close To My Heart’s NEW Artbooking Cricut Cartridge!!  

As you may know, EACH of CTMH’s Cricut cartridges have 700 images (not sizes…) AND they coordinate with MANY of our stamp sets -allowing us to have BEAUTIFUL, but quick & easy creations!!!

I KNOW you will have fun browsing the MANY ways you can use our NEWEST Artbooking cartridge!!! J So come on in and continue on this hop…

If you have come from Mary Gunn’s Blog…you are on the right track!  


Our challenge during the month of August was to create 4 different projects using the Cricut Artbooking cartridge and we could use any CTMH paper pack. 
We will each be creating one of the following items each week…
1. 2 page layout
2. Card
3. Mini Book
4. Home décor or “giftable” item
We were able to choose which of these 4 items to create and choose which Monday to post it.  This is a circular hop, so if you get lost along the way CLICK HERE to see the complete list posted on Adeline’s (our fearless coordinators) blog.

This week I wanted to share with you  
a mini album I created

With the Christmas season quickly approaching, I ventured to create a Christmas mini album!! 
Christmas mini-album_Artbooking DSC_2998
I wanted this album to be QUICK and EASY
and to me, quick and easy means NO STAMPING or INKING!
If you know me well - you then know how HARD it was for me to create an album in this fashion. J

Instead of using my “normal” items of stamps & inks - I chose to make sure there was some type of sparkle or glitter on each page. J FUN!!!

For the majority of this album, I  used the O key…
key O- Christmas mini album
and the P key in the Artbooking cartridge booklet.  I kept the size on the suggested size of 10” as I created this album.
key P- Christmas mini albumI am still AMAZED at how this Artbooking Cricut cartridge makes creating mini-albums and 2 page layouts as easy as 1…2….3!!!!   It’s WONDERFUL!!!!


Here is a close up of the cover of the album.
Christmas mini-album_Artbooking pg1 closeup DSC_2998
I did cut out TWO Barn Red base pages.  I then cut out the 3 ornaments of the 2nd base page so I could give some depth to my ornaments on the cover.  I also glued the entire barn red base page to the olive “december” base page, instead of making two separate pages.


Christmas mini-album_Artbooking pg2 DSC_2998

For the 2nd page, I chose to use just cardstock, accented with some glitter paper. 

I LOVE the way the mini-albums have so many “see through” aspects! 


You can see the swirl peeking through the circle with merry…you’ll see where that comes from as we turn to the 3rd page.


Christmas mini-album_Artbooking pg3 DSC_2998 For the 3rd page I took a wider shot of the album, so that you could see how you COULD use ALL sides of this album!!

  At this time, I chose not to do that…but I would like to add to this album in the near future and create on the left side of my pages as well! 

Did you notice the swirl??  Just a simple accent added to the photo mat. 


Christmas mini-album_Artbooking pg3 closeup DSC_2998
I love how EASY it is to layer  shapes to add dimension to any item!!!  Here I built a star - and added some 3D foam tape to give it a “pop”! 

The metal swirl AND the sparkle center - all come from the Rosewood mini-medley collection. 


The4th page is a mini page…and I LOVE how the glitter border (cut from the O Key) turned out on this page!  

 Our 12x12 glitter paper can be placed on your cricut cutting mat, and you can CUT away!!!(make sure the blade setting is on the highest of 6)
  Glitter paper REALLY ADDS an extra touch to ANY creation!!!  Christmas mini-album_Artbooking pg4 DSC_2998
How EASY - and SIMPLE this 5th page turned out to be!!!  I LOVE the scalloped edged photo frame - which comes from the “2 of a kind” key!

Christmas mini-album_Artbooking pg5 DSC_2998 
By filling in the holly cut out with glitter paper…it completes this page. 


The 6th page, and final page, is again simple…but still looks GREAT even though there is no inking or stamping!
Christmas mini-album_Artbooking pg6 DSC_2998
I believe this reindeer is going to become famous J and will be used often in many creations.  The photo mat (another favorite design of mine) comes from the “snow” key. 


I hope you enjoyed this album, and can see how QUICK & EASY this NEW Artbooking Cricut Cartridge makes our creating- without taking away the beauty of the creation!! 
Christmas mini-album_Artbooking- cover DSC_2998
In case you would like to try to create an album similar to mine, here is a list of the items I used on this album- or feel free to contact me with any questions you may have !J


Products Used on my MINI-ALBUM…
Now, hop on over to Kimberly Hill’s Blog to see what she has created using this NEW Artbooking Cartridge!! 

If you get lost along the way CLICK HERE to view the entire list of Artbooking creators! 


Happy Hopping and make sure to JOIN US again next Monday for our LAST week of items created using this FABULOUS Artbooking Cartridge!!
  
Blessings to you for a WONDERFUL day!!!
Krista J